
Last month we launched a new website for a restaurant client. 4+ years ago we built their first website. At the time uploading a PDF menu for folks was acceptable. But, with the advent of a more mobile web user, we knew that on this latest version of the site we wanted to display the menu on their site in html formatted text.
Because this is a fairly small site, with fairly simple content needs, we made the decision to use Statamic as the CMS. One of the first things we needed to do was to take the structure of their PDF-based menu and think through how we could turn it into publish forms in Statamic that make easy for them to update. Next, we considered how to lay out that content within Statamic so it was easy to read and understand. Last, we had to consider how to take that content and display it on the front-end in a clean, easy to read manner.
This particular menu contains notes about consumer info, gratuity, product information and consumption of different food items. Some of these are required by law so they have to be on the site. The easy way out would have been to just hard code them into the page. But we don't like taking the easy way out. They also wanted to provide the menu in PDF format as a download. We decided that the 'Menu' page would need two fieldtypes, so we created a new fieldset called 'menupost.yaml' with the following:
title: Menu
fields:
 content:
 display: Menu Note
 instructions: Any menu notes
 required: false
 default:
 type: redactor

 menu_pdf:
 display: PDF of menu
 type: file
 allowed: [pdf]
 destination: assets/
The first field is for basic content like the consumer info, gratuity, etc. The other field is a file field that allows the client to upload a PDF version of the menu. We made sure the client is only able to upload PDFs to this field by setting 'allowed: [pdf]'. Also note that we specify where that file will be uploaded.
Save menupost.yaml and complete this step by making it available to the user by adding the fieldset to page.md under our Menu page.
With that complete we need to think about the actual menu itself, the individual sections. Looking at the menu again we notice that it is broken down into different sections:
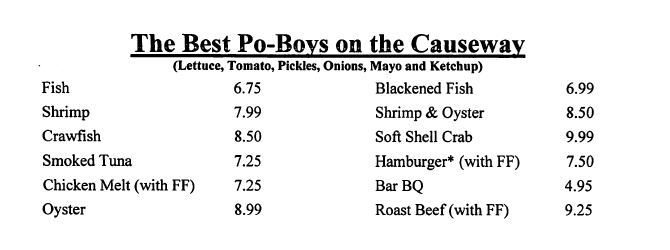
What we are going to do is set this up as entries under the Menu page. Think of each section as a 'blog entry' (Read more about Pages and Entries here). For this set of entries we needed a new fieldset. Our solution was to use the Grid fieldtype. Each section within the menu is comprised of the same basic parts; section title, a section description, item title, item description, a primary price, and a secondary price. A few of these fields were also optional so that was noted as well.
We setup the fieldset like this:
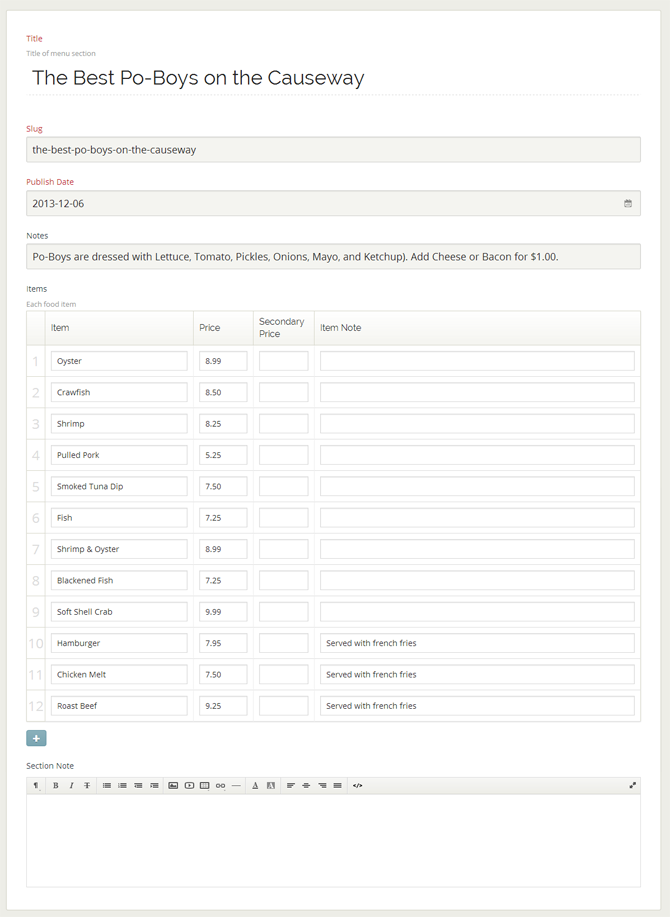
title: Menu
fields:
 title:
 instructions: These are instructions.
 notes:
 type: text
 display: Notes
 items:
 type: grid
 display: Items
 starting_rows: 2
 min_rows: 2
 fields:
 item:
 display: Item
 type: text
 width: 25%
 main_price:
 display: Price
 type: text
 width: 10%;
 secondary_price:
 display: Secondary Price
 type: text
 width:10%
 item_note:
 display: Item Note
 type: text
 width: 55%
 instructions:
 above: Each food item

 content:
 display: Section Note
 required: false
 default:
 type: redactor
The first field you see is 'Notes'. On the PDF version of the menu this is the little note under each title so a text fieldtype is perfect. Second is the items using the grid fieldtype. It contains 4 fields: Item, Price, Secondary Price and Item Note. Again some fields are optional of which we will cover later on. The last fieldtype is a redactor field for Section Note. This a note at the bottom of each section for additional info, again optional.
After saving this it creates the following:
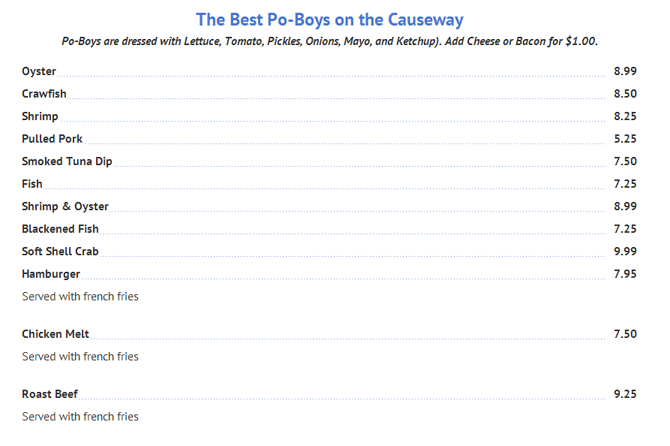
Now that setting up the content interface for the client is complete we need to display it on the front-end. We do this via a template. We've named ours menu.html for SEO purposes.
In the template we address the optional fields by using a conditional statement:
{{ if menu_pdf != "" }}
Click here to download a copy of our menu (pdf format)
{{ endif }} {{ entries:listing folder="menu" sort_by="date" sort_dir="desc" }}
{{ title }}
{{ if notes != "" }}
{{ notes }}
{{ endif }}
- {{ items }}
-
{{ item }} {{ if main_price != "" }}{{ main_price }}{{ endif}}{{ if secondary_price != "" }}{{ secondary_price }}{{ endif}}
{{ if item_note != "" }}{{ item_note }}
{{ endif }} - {{ /items }}
{{ /entries:listing }} {{ if content != "" }}{{ content }}{{ endif }}
If you have not done so already, take a few minutes to enter in some content. The code from above will output the raw HTML + content. From this point all you have to do is apply a little CSS to produce a simple but very elegant restaurant menu.
I hope you found this useful. Our plan is to post a blog post or two per month on Statamic. Follow us on twitter to stay updated!